Chicago SharePoint Solutions Blog

Tuesday, December 11, 2007

Blog Moved

This blog has been moved to the following location:
http://www.sharepoint-screencasts.com/blog

Please come visit that site. In addition to my blog, this site also provides free Screencasts, Webcasts and Knowledge Maps.

-Asif Rehmani

Wednesday, November 14, 2007

Promote and recommend SharePoint content

So where do you currently go to look for pointers on various SharePoint content…? There are so many sites which claim to provide links to "good" SharePoint content that it's hard to keep count. Why not have a central place where users can recommend various content on functionality related to SharePoint Products and Technologies and then other users can recommend that content if they find it useful... Kinda like how digg.com currently does it.

Well, this concept is now a reality! SharePointPedia.com was launched a couple of weeks ago and it contains community driven content recommendations. It doesn't have that much content out there yet, but it's growing steadily. You can be a part of it as well and submit or recommend content. It's as simple as signing up on the site. Here's a snapshot of how it currently looks:


Friday, October 27, 2006

Backing up a Site Collection

Difficulty: Medium
Applies to: WSS v2

Problem Statement
You have created several Sites and Subsites in your WSS deployment in a Pilot environment. The time has come to move some of these sites to a Production server. You have access to your WSS sites as an Administrator and/or a Web Designer and you have a copy of Microsoft FrontPage 2003, but you do not have access to the Physical SharePoint server.

Solution
A Site Collection is defined as a Top Level WSS site and all Subsites underneath it. When a SharePoint administrator decides to copy or move a Site Collection, she usually uses command line tools such as stsadm.exe and smigrate.exe. However, to use these tools, access to the SharePoint server is required. If an end user with at least Web Designer privileges wishes to backup and restore a Site Collection, she would need access to Microsoft FrontPage.

To backup a Site Collection or an individual Site from your Pilot environment, first start FrontPage on your client computer. Click on File -> Open Site, then enter the address of the site on the pilot server (ex: http://pilot.wss.com/sites/site1). Click on “Open”. The Site that you wish to backup should now be displayed in FrontPage.

To backup this site, follow these steps:

  1. Click on Tools -> Server -> Backup Web Site. The following dialog box appears:

Note:If you wish to backup all Subsites underneath this site, check the checkbox to indicate that.

  1. Click “OK”
  2. The “File Save” dialog box will appear. Save the file at any location in your client computer. Notice that the backup file that’s created has the extension .fwp

Now comes the time to restore the Site or Site Collection that you have backed up on the Production server. I’m sure you must have noticed that there is a “Restore Web Site” option right beside the “Backup Web Site” menu option. Your first thought might be that it would be easy to start FrontPage and restore the site at any location. However, the restore process is not that simple. To restore a site backup, the site must be created first (either through the Web UI or a command line tool) without a template and then the restore option from FrontPage can be applied.

To restore this site, follow these steps:

  1. Browse to the Production WSS server and start a new site creation process at the location where you wish to restore the site:

  1. Enter in your site information (Name, URL etc) and then click on “Create” to go to the template selection page

Note: The site is now created at this time (ex: http://production.wss.com/sites/site1) without a template having applied to it

  1. DO NOT apply a template to the site. That means that when the following page appears, you do not click on “OK” at this page

  1. From this page, click on File -> Edit in Microsoft Office FrontPage. This will open this site in FrontPage

Note: If you see a dialog box at this point telling you that “Files in _layouts folder are not available for editing”, just click on “OK” to acknowledge it

  1. Now that your site is open in FrontPage, click on Tools -> Server -> Restore Web Site
  2. From the “File Open” dialog box that appears, navigate to the backed up .fwp file and then click “Open”
  3. Click “OK” on the “Restore Web Site” dialog box that appears

That’s it! Your Site or Site Collection that you had backed up will now be restored at this location. You can now browse to your Production site (ex: http://production.wss.com/sites/site1) to verify.

Monday, September 18, 2006

Send Link of a Document in the Document Library

Difficulty: Medium
Applies to: WSS 2.0 and SPS 2003

Problem Statement
You store all of your documents in a Document Library which is exposed on the Home page of your site. You frequently need to point other people to your documents you would like them to review. Currently, the solution you employ is to manually copy the link to the document, open up a new email composing window, paste the link and send it to them through email. You would like to make this process more efficient.
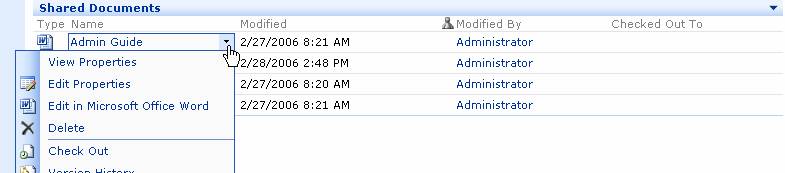
Solution
The following solution will add a context menu item to the existing context menu actions that can be executed for each document in the document library. Currently, the context menu looks as following:

Figure 1. The original context menu of a Document Library

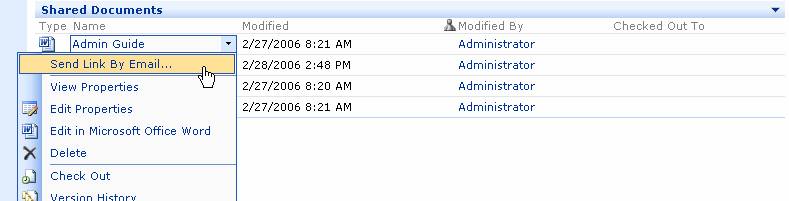
The final solution will augment this menu to look like the figure below:

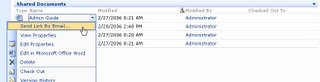
Figure 2. The “Send Link By Email…” link has been added to the Document Library context menu

When the “Send Link By Email…” link is executed, it will bring up your desktop mail client with the link in the body of the email and a pre-populated subject line. The user can then enter an email address and send the link on its way (Figure 3).

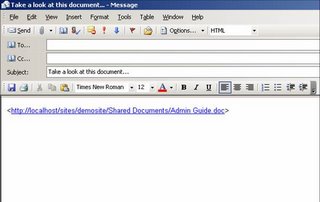
Figure 3. Email composing window with pre-populated fields

If you have not acquainted yourself with the “Content Editor Web Part (CEWP)” yet, I would highly recommend you do so. This Web Part comes with the initial installation of both WSS and SPS 2003 and can be found in the Web Part Gallery. The purpose of this Web Part is to provide the user the ability to quickly insert content onto any Web Part page. The content can be in shape of rich text, html or even javascript or vbscript. We will use the CEWP in this scenario to insert javascript onto a WSS site’s Web Part page to enable the email functionality.

This scenario is assuming the following:
• Your Document Library Web Part is already deployed on a Web Part page somewhere in your site
• You have permission to add additional Web Parts on the page

To start, browse to the page (in WSS or SPS) where the document library is located. Make sure you are able to access the context menu for the documents in the document library (as shown in Figure 1 above). If you are not able to access the menu by hovering over each document, you will need to change the “View” of the document library. This can be done by first clicking on the “Modify Shared Web Part” link for the document library which brings up the Web Part properties pane (Figure 4 below). Change the Selected View option to “All Documents”.

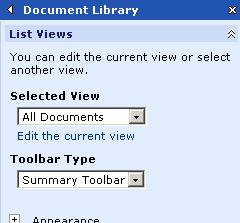
Figure 4. The Document Library Web Part properties pane

The next step is to drag the Content Editor Web Part (CEWP) on this page. As I mentioned earlier, this Web Part can be found in the Web Part Gallery. Once deployed on the page, access this Web Part’s properties pane by clicking on the “Modify Shared Web Part” link. In the properties pane, click on the “Source Editor…” button. This will bring up a text entry window. Copy the following javascript into this window:

function Custom_AddDocLibMenuItems(m, ctx)
{
var strDisplayText = "Send Link By Email...";
var strAction;
var strImagePath = "";

// parse the URL out of the itemTable
var URL = "";
var index = itemTable.innerHTML.indexOf("href=");
if (index > 0)
{
var str = itemTable.innerHTML.substr(index + 6);
index = str.indexOf('"');
if (index > 0)
{
URL = str.substr(0, index);
}
}
if (URL != "")
{
strAction = 'window.navigate("mailto:%20?subject=Take a look at this document...&body=<' + URL + '>")';

// Add menu item
CAMOpt(m, strDisplayText, strAction, strImagePath);
// add a separator to the menu
CAMSep(m);
}
return false;
}

Click on the “Save” button to save the javascript in the CEWP. Close the Web Part properties pane.

That’s it!! Now if you try to access the context menu of any item in the document library, it should be rendered as in Figure 2 above and should display the “Send Link By Email…” link.

Side Tip: The CEWP will still show on the page as an empty Web Part. To hide this Web Part while keeping the functionality that it provides, access the Web Part properties pane and uncheck the “Visible on Page” option under the “Layout” section.

Wednesday, August 23, 2006

The !New Tag

Difficulty: Low
Applies to: WSS v2 and SPS 2003

Title
The !New Tag

Problem Statement
You are importing multiple documents into a document library from their current location in the network drive. When the import is done, you notice the presence of the “!New” icon next to all documents. Even though these documents are newly imported in the document library, their creation dates show them to have been generated a lot earlier than that. This could become very confusing to the end users. You want to change SharePoint’s configuration to eliminate the presence of this tag.

Solution
In the default installation of SharePoint, the “!New” tag gets appended to every new item in SharePoint lists and remains there for one calendar day.


This feature applies to not only Document Libraries, but also to other Lists such as Tasks, Issues, Contacts, Links etc. An administrator who has access to the SharePoint server has two options when changing the behavior of this feature:
Increase the number of days the icon should beside a new item in the list
Eliminate the appearance of the icon altogether
The stsadm.exe utility (located in the SharePoint server) is used to accomplish this task.

Navigate to stsadm’s location using a command prompt:

cd program files\common files\microsoft shared\web server extensions\60\bin

The “setproperty” command will be used for this task:

stsadm.exe –o setproperty –pn days-to-show-new-icon –pv (number of days) –url (Virtual server address)

For example, use the following syntax to prevent the new tag from appearing:
stsadm.exe –o setproperty –pn days-to-show-new-icon –pv 0 –url http://(your server name)

Series of Articles- Creating Solutions using SharePoint

The following posts will be a series of articles each of which will explore a business problem that a user might face when working with WSS and/or SPS. For each business problem, the article will propose a solution with step by step instructions.

Enjoy!

Start

This blog is dedicated to all things SharePoint. It will be a mix of content from the current version of SharePoint (2003) and the next version (WSS v3 and SharePoint Server 2007).